Showing posts with label Norwegian. Show all posts

Wednesday, March 6, 2013

Grandma Elly's Norwegian Meatballs


When I was a little girl I couldn't wait for visits to my Father's parents' home. My Grandmother would never tell us when she was going to make them, but every time we got there for dinner I was hoping that the first step through the door would bring the wonderfully comforting aroma of her Norwegian Meatballs.

Basically, Norwegian Meatballs are the same as a Swedish Meatball, but my Grandma would never agree to that statement...she is Norwegian, therefore what she makes is Norwegian. By far, this was my favorite dish and one that I would always beg for my Grandma Elly to make for us.

Friday, July 16, 2010

Kransekake ~ Norwegian Crown Cake or Viking Wedding Cake


Baking Kransekake has been a tradition in my family forever...typically for Christmas Eve. But honestly, this should be made for many other family get togethers. In Norway this traditional wedding cake is served at other celebrations such as birthdays, 17th of May (Syttende Mai), which is Norway’s Constitution Day and other special events.
 
It's just so good with a big cup of coffee after dinner...or in the morning at breakfast time. The good news: It's flour-free! The bad news: It's half confectioners sugar. (powdered sugar) The other good news: It's fat-free & packed with almonds! (I try to find more good news than bad news in my desserts) This "cake" is not your typical cake...as you can see, it resembles a tower - which apparently inspired another name, Tower Cake (tårnkake in Norwegian). If you follow tradition, then the way to decorate the Kransekake would be to stick little flags and colorful candies into it.

 My family keeps it clean and forgoes the tradition of sticking things into the cake...we just want to get at it and eat it! How do you serve such a cake? I'm glad you asked. The way to serve Kransekake is every man, woman and child for themselves. You start by removing the bottom ring of the cake and break it apart...then work your way up the cake right up to the tippy top.


The cake is easy to make using the special baking forms. click the image on the left to order baking molds If you don't have the baking rings/molds, place baking paper on cookie sheets and form 18 rings in graduated sizes to build the tower. I have the rings that my grandmother always used...yes, they are old and I'm kinda wanting to get some new ones, but they work so well that I'll wait until I completely destroy them. Okay, lets get to baking these sweet & nutty rings.

 
Start off by taking18 oz. of raw almonds and pour those into a food processor. I like buying the 3 pound bag at Costco and just separating it into thirds…it’s perfect when I’m making Fyrstekake and Kransekake (Crown Cake or Norwegian Wedding Cake).
 
 You’re going to want to grind them up until they are basically crawling up the sides of the processor and you can see that the oils have released.
 
 Here’s what your processed almonds should look like.
 
 Then into the mixing bowl they go.
 
 The next step would be to add the confectioners sugar and give it a mix on low speed. Please, don’t try to rush it or you’ll have powdered sugar everywhere…take it from me, it’s not fun to clean up.
 
 
 Add in 4 egg whites and continue to mix on low speed until everything is well incorporated. Scrape down the sides and along the bottom of the mixing bowl just to make sure that there aren't any almonds that haven't been incorporated into the mixture.
 
 
Turn the attention to the forms. Taking a paper towel, apply a little butter or shortening to the surface of each ring form.


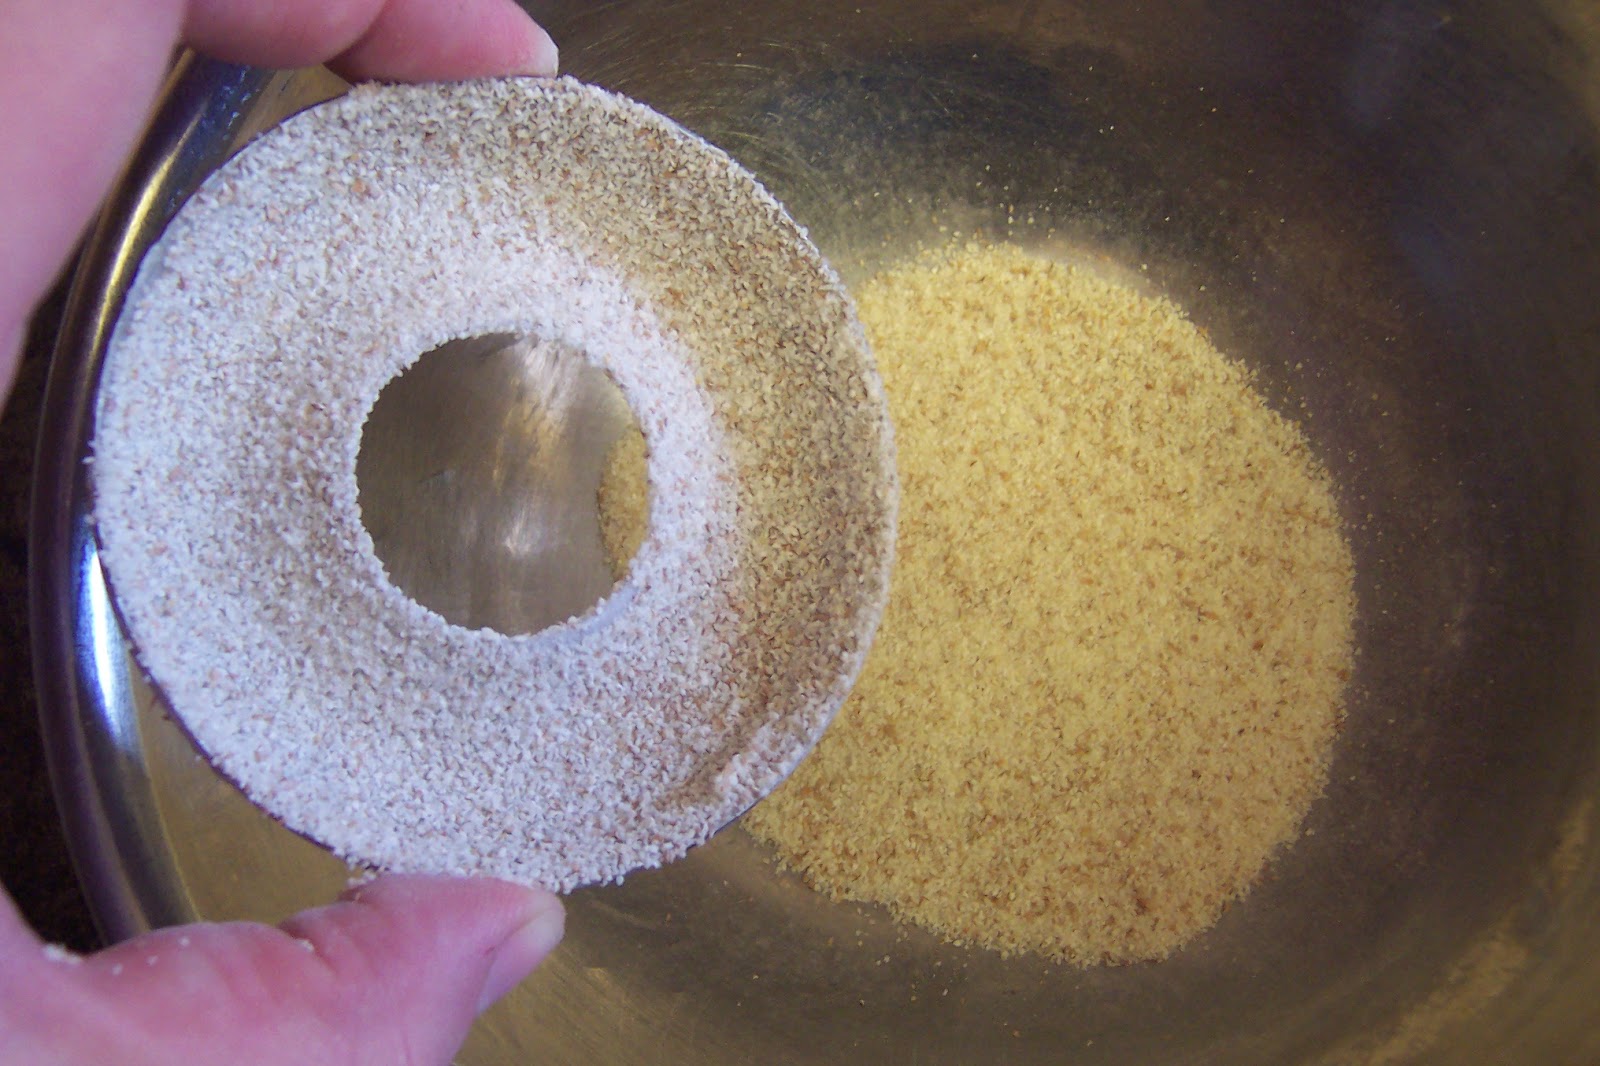
Then take the Cream Of Wheat and pour it into a medium sized bowl. Scoop it with the form and allow the Cream Of Wheat to completely coat it. Then turn it upside down and give a little tap to release any stray bits.


Repeat with all of the forms and set them aside onto a cookie sheet.
 
 
 Now to our dough. You can wrap it up in plastic wrap and chill it in the fridge for a couple hours to make it a little more pliable for rolling out. However, I tend to go straight from the mixer to the prep mat and start rolling out my ropes of dough. Start with about 5 Tbsp. of dough, or just a golf ball sized ball of dough, and roll it with the palms of your hands to form a rope the thickness of your index finger or thumb. Lay the rope of dough into the form...DO NOT press down...cut off any excess rope and pinch off the ends to make a complete circle.
 
 
 Place the rings on a baking sheet and into the preheated 350°F oven. Each ring has a different baking time, so you have to keep your eyes on them. However, you can set a timer for 15 minutes and then check every couple of minutes to see which rings need to be removed from the oven. (the smaller rings take between 10-12 minutes) You want them to be a light golden color. Watch carefully, they will burn quickly if unattended.
 
 
 Once removed from the oven, let the rings rest a few minutes before taking cakes out of the forms. (I tend to allow 10-15 minutes...those forms are HOT)  Do your best to refrain from taste testing them as they come out...its hard, but you should have plenty of dough leftover to make some just for you. (or to replace those that decide to break on you)


Turn the forms over and tap the bottom of the form with the handle of a table knife to release the cake. If they do not release easily, very carefully use a table knife and make your way along the edges of the cakes. Place on cooling racks until completely cooled.
 

While waiting for the forms to cool, throw together a little icing with complete ease. Take powdered sugar, almond extract and a little milk to make the icing as thin or thick as you like. Mix with a small wire whisk or teaspoon until the lumps of sugar have been broken down and dissolved.
 
 
 Then it's time for assembly. Start by making a ring of icing right under the largest cake ring. This will help hold everything in place. Then continue to place a layer of icing along the top of each ring, building from largest ring to smallest. Drizzle any remaining icing along the rings of the cake.
 
 
Time to jump in and start enjoying your creation. Tradition calls for the bottom ring (largest) to be broken and removed from the tower...and devoured first. Then work your way up to the smallest ring at the top.

Sunday, June 27, 2010

Fyrstekake ~ Norwegian Almond Coffee Cake (Royalty Cake)

This has to be my ultimate coffee cake...one that I grew-up having all the time at my grandparents' house. Looking at it you wouldn't normally categorize it as a "coffee cake", however let me assure you that this is perfectly paired with a hot cup of coffee.

It's packed full of almond goodness...and sweet sugar. But with two contrasting layers of delight, to me it is the ultimate coffee cake. You have this wonderful buttery bottom cookie-type layer topped with a sweet & chewy almond layer on top. Heaven!
This is really so simple that you'll be wondering why you haven't come across this recipe before. So let's get baking!
I like to make the bottom layer of the Fyrstekaker first. In a large mixing bowl I pour in my flour, baking powder and sugar. Turn the mixer on to low speed, just to incorporate all of the dry ingredients first.
Then it's time to add in the butter and egg yolks. Mix them in again on the low speed setting. Be sure to reserve the egg whites! We need them for the topping.
Your dough should look just like this once everything has been mixed together.
Prepare a large spring form pan, I like using a 16" round pan, by greasing/buttering the entire pan. There is no flouring necessary! Then plop our dough right into the center of the pan an begin pressing it to a 1/4" or so thickness.
Continue to press the dough up the sides of the pan, like forming a pie shell. Now that that's done, just set it aside. Give the mixing bowl a quick cleaning and get ready to make the topping.
Take 1 pound of raw almonds and pour those into a food processor. I like buying the 3 pound bag at Costco and just separating it into thirds...it's perfect when I'm making Fyrstekake and Kransekake (Crown Cake or Norwegian Wedding Cake).
You're going to want to grind them up until they are basically crawling up the sides of the processor and you can see that the oils have released.
Here's what your processed almonds should look like.
Then into the mixing bowl they go.
The next step would be to add the confectioners sugar and give it a mix on low speed. Please, don't try to rush it or you'll have powdered sugar everywhere...take it from me, it's not fun to clean up.
Add in the reserved egg whites and continue to mix on low speed.
Next add the cold water. Again, continue mixing on low speed. Take several breaks to scrape down the sides and bottom of the mixing bowl to make sure that everything gets well combined.
Here is your finished topping.
Pour the topping into the pressed dough shell.
Continue adding the topping making sure that it does not come up over the edges of the dough shell's walls.
Place in the oven and be very patient for 45-50 minutes. It's going to be hard, I know, but trust me...when you take this out and let it cool down, it's going to be worth every minute.
Once the Fyrstekake is finished baking, remove it and allow it to sit for 20-25 minutes before releasing the spring form pan. You may have to use a table knife around the edges of the pan to fully release it. Continue to allow it to cool for another 45-60 minutes. This will allow the almond filling to fully set-up.
Traditionally, Fyrstekake is plated on a large decorative serving dish for everyone to serve themselves and enjoy. I tend to leave it on the base of the spring form pan and just set it on a decorative dish...allowing me to place the spring form around it later to easily cover and store in the refrigerator.
Then once you slice into it, here is the beautiful greeting you are given. Your mouth is just about ready to sing you praises for your limited effort.
I hope that your family will enjoy one of my family's favorite traditional Norwegian desserts as much as we have.


Fyrstekake ~ Norwegian Almond Coffee Cake

Prep time: 15 minutes
Cook Time: 35-40 minutes (16" pan), 45-50 minutes (12" pan)
Level: EASY
Preheat oven 350° F

Cookie Layer:
Ingredients:
2 cups All Purpose Flour
1 tsp. Baking Powder
3/4 cup Granulated Sugar
1 1/2 sticks Butter (or 1 stick Margarine & 1/2 stick Butter)
2 Egg Yolks (reserve whites for almond topping)
1 Tbsp. Cold Water

Directions:
Grease a large spring form pan. (12"-16" round) In a large mixing bowl blend together flour, baking powder and sugar. Add butter and egg yolks. Mix until incorporated. Add cold water and mix until incorporated. Place dough into the center of the prepared spring form pan. Press dough to cover the bottom of the pan and up the side walls. About 1/4" thick. Set aside.

Almond Topping:
Ingredients:
1 pound Raw Almonds
1 pound Confectioners Sugar (Powdered Sugar)
2 Egg Whites
1/2 cup Cold Water

Directions:
Pour almonds into a food processor. Grind until it becomes fine granules and climbs up the sides of the processor's container. Pour into a large mixing bowl. Add confectioners sugar and mix until incorporated. Add egg whites and cold water. Mix until fully incorporated. Pour on top of dough in the spring form pan. Make sure that the almond topping level does not go above the edge of the pressed dough walls. Place in the center of preheated oven and bake for 45-50 minutes. (depending on the oven and size of the spring form pan used) Cake is done when the top is golden and the center no longer jiggles when pan is moved.

Remove from oven and allow to cool for 20 minutes before releasing the sides of the spring form pan. Use a table knife or small decorating spatula around the edges if necessary. Allow to cool an additional 45-60 minutes before serving, allowing the almond filling to set-up. Cake then can be carefully removed from the bottom of the spring form pan and plated on a large decorative serving plate.

 ENJOY!