Showing posts with label Breads. Show all posts

Sunday, March 3, 2013

The Keys' Key Lime Scones


I am a ridiculously huge lover of scones...so far there hasn't been a scone to cross my path that I haven't at least liked, if not loved.

But sometimes I like to have a little *zing*...so I decided to have some fun with key limes. So, if you like limes, key lime pie or just some *zing*, then I think you're going to love these little goodies too.

Saturday, July 14, 2012

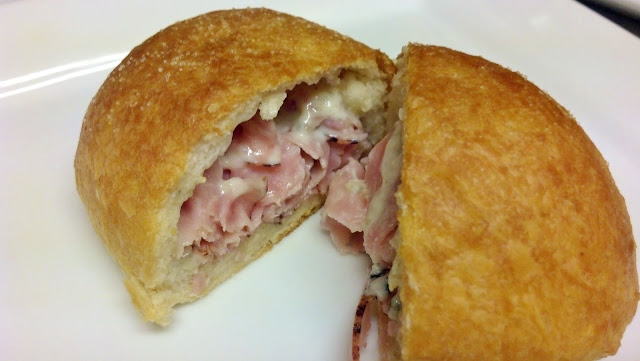
Ham & Gorgonzola Cheese Stuffed Buns


These stuffed buns are so much better than those you can pick up in the frozen food section.  Why?  They're fresh baked and you get to fill them yourself with as much meat as you can pinch into that bun.

Perfect as a lunch or dinner main dish...okay, you might need 2 per person for dinner.  OR, if you have a get together planned, turn these little beauties into 2-bite appetizers!


Ham & Gorgonzola Cheese Stuffed Buns

Preheat Oven:  375° F
Prep Time: 15 minutes
Bake time: 12-15 minutes
Level: Easy

Ingredients
8 Pillsbury Grands Flaky Layers Buttermilk Biscuits
Black Forest Ham, thin sliced (lunch meat is fine)
1 Tbsp. Gorgonzola Cheese
1/2 tsp. Dijon Mustard, per biscuit (optional)
2 Tbsp. Butter, melted


Directions
Take one biscuit and flatten it by pressing with the palm of your hand or fingertips.
Place the Gorgonzola cheese in the center of the biscuit, leaving a 1-inch border around the biscuit edges clean.
Place dijon mustard on top of the cheese. (this step optional)
Roughly chop ham and place on top of cheese.
Bring up the edges of the biscuit, gather and pinch together sealing the fillings inside.

Place on a lined baking sheet (SILPAT, foil or parchment paper) allowing 1-inch minimum in between each biscuit.

Brush melted butter over the top of each biscuit. Lightly season with salt. (salt optional)

Bake for 12-15 minutes until tops are golden brown. (15 minutes needed if using SILPAT lining)

Serve & enjoy!

Tip: Cut biscuits in half before assembling and form into a disk to create smaller biscuits for appetizers or kid-sized bites.

Sunday, January 1, 2012

Baked Goods & Desserts

For those times when you need something a little sweet or something extremely decadent, enjoy some of the recipes that have soothed my family's sweet tooth. 

Be sure to make adjustments to all Baked Goods recipes if you live in a high elevation (see my posting High Altitude Baking)


Banana Nutty Bread ~ One of my favorite breads to make
Cheesy Garlic Monkey Bread ~ A change from the garlic bread norm
Cheesy Pub Beer Bread ~ So ridiculously good & simple to make. Ultimate comfort food! 
Cherry "Valentine Love" Pies ~ Extremely easy to make hand pies! Great for kiddle bakers too! 
Chocolate Flecked Coconut Bark (Cocada con Chocolate) ~ It's like having a warm Mounds bar 
Dark Chocolate Kahlua Mocha Cake (a.k.a. Blackout Cake) ~  Ridiculously decadent for dark chocolate & coffee lovers (with a little quick cheat along the way)
Fyrstekake ~ Norwegian Almond Coffee Cake (Royalty Cake) ~ A wonderful Norwegian coffee cake packed with almonds** 
Grandma Stella's Cornbread ~ My Grammy's cornbread recipe (traditional or sweet) The Keys' Key Lime Scones ~ Buttery scones with a little key lime "zing" 
Kransekake ~ Norwegian Crown Cake or “Viking” Wedding Cake ~ Almond "cake" ringed tower**
PB & J Freezes ~ Be a kid again...frozen graham cracker PB & J sandwiches
Personal Spiced Pineapple Upside Down Cakes ~ A small twist on the classic pineapple upside down cake 
Princess Cupcakes ~ A fun twist to plain cupcakes 
Spiced Monkey Bread ~ This monkey bread is the hit of any breakfast, brunch or dessert **
Sweet Potato Banana Crumble Casserole ~ If you like sweet potatoes, you will love this recipe...if you don't like them, then you will love this casserole. Perfect as a side or dessert dish! ** ** No high altitude changes necessary

Black & White Cranberry Almond Cookies
COOKIES    
Black & White Chocolate Chip Cookies ~ Simple semi sweet chocolate chips meet white chocolate chips
Black & White Cranberry Almond Cookies ~ Semi sweet & white chocolate chips combined with cranberries and almonds
Cheat-N-Eat Candy Cane Cookies ~ Perfect way to dress-up sugar cookies for the holiday season
Cranberry Almond Chocolate Chip Cookies ~ A wonderful combination of cranberries, almonds & chocolate
Exceptional Chocolate Chip Cookies  ~ My favorite (and simple) chocolate chip cookies
Fortune Cookies - Almond ~ A very simple recipe that I found in Woman's World 2008 

SCONES 
Scrumptious Citrus Chocolate Chip Scones ~ The marriage of orange & chocolate in a scone!**
Cranberry Orange Scones ~ A classic scone, but a little less dense than store-bought**
The Keys' Key Lime Scones ~ Tart and sweet combine in perfect harmony

FROSTINGS
Chocolate Cream Cheese Buttercream Frosting ~ Fluffy & chocolatey  
Cream Cheese Buttercream Frosting ~ Light, sweet & creamy
Chocolate Mocha Ganache ~ A chocolate & coffee lover's dream

PUDDINGS
Baileys Irish Cream & Chocolate Tapioca Pudding ~ Such a great way to celebrate St. Patrick's Day
Easter Pudding Baskets ~ A creative (& easy) kiddle recipe for Easter


Thursday, June 24, 2010

The Keys' Key Lime Scones


I am a ridiculously huge lover of scones...so far there hasn't been a scone to cross my path that I haven't at least liked, if not loved. But sometimes I like to have a little *zing*...so I decided to have some fun with key limes. So, if you like limes, key lime pie or just some *zing*, then I think you're going to love these little goodies too.

View complete posting: The Keys' Key Lime Scones

Wednesday, April 14, 2010

Cheesy Pub Beer Bread


Just look at this golden loaf of comfort!
 
Oh, just the smell of this bread in the oven immediately takes me back to when my mother used to make it when I was little. It seemed like she made it all the time when I was in grade school...I don't know what happened after that. Somehow it just disappeared from our menu altogether.

Well, it’s BACK! And back to stay! This is truly the easiest recipe in the world to make a scrumptious loaf of bread. In fact, you’ll find that you have to hold yourself back from making it all the time.

Would I call it a comfort food? Oh yeah, you better believe it! So enough chatter…let’s get to baking! (And we only need 6 ingredients to get the job done!)
 
 
Start with some all-purpose flour. Nothing fancy here…the simpler the better.
 

Add baking powder. Then give it a little stir with a fork just to mix it around.

 
Next add some sea salt. Stir that in with a fork.


A little bit of sugar…bread needs just a touch of sweetness. Again, stir it in with the fork to get it all incorporated.
 
 
Now for the best part. Here’s the beauty of this…you can use a cheap beer or a pricey port. It’s up to you. 
 
To be honest, the darker beers tend to give the best flavor…at least that’s what Charming says. (He really liked this Michelob Amber Bock) But no matter what you choose, you’re still going to love it. (This happens to be my preferred method of enjoying a beer.) 

 
Pour in that yeasty goodness…it’s not only our flavoring agent, it’s the secret to not needing yeast or self rising flour!

 
Give everything a good stir…I just use my fork, but a spoon is fine too. And don’t worry, it’s supposed to be lumpy & bumpy.

 
Now you can skip this step if you are trying to stay away from dairy, or just trying to cut some calories….


I take some shredded colby jack cheese (1 cup) and add it to the dough. Mild or sharp cheddar cheese is really good too!
 
 
Grab a loaf pan and grease it with 1 Tbsp. of the butter.
 
 
Form the dough into a rough ball.
 
 
Plop our cheesy beer dough into the pan and form a loaf.
 
 
Then into the oven for 45 minutes. And trust me…you’re going to wish that you had made two loaves when the aroma starts wafting through the air.

 
When the timer goes off, remove the bread from the oven but don’t turn it off! Cube and melt the remaining butter. (I melt it in a microwave safe measuring cup for about 30 seconds)

 
Then carefully pour all of that melted butter over the top of the bread.
 
 
Resist temptation and return the glistening, buttery bread to the oven for another 10-12 minutes. We want that butter to get the top of the bread all crusty and golden brown.


The timer sounds! The bread is removed from the oven! There should be a slight springiness when it’s pressed. A knife makes its way through the loaf…a little bit of butter is slathered onto the bread….and instant gratification!
 

So perfect alone for a little snack. (A great pairing with roasts, corned beef or Norwegian Meatballs)
Enjoy, Enjoy, ENJOY!

Cheesy Pub Beer Bread
Prep Time: 6 minutes
Cook Time: 55 minutes
Servings: 8
 
Ingredients:
3 cups Flour, All-Purpose
4 tsp. Baking Powder
1 1/2 tsp. Sea Salt
2 Tbsp. Sugar
12 oz. Beer, dark or light
1 cup Colby Jack or Cheddar Cheese, shredded
5 Tbsp. Butter, divided

Directions:
Preheat oven to 350°F. Grease a loaf pan with 1 Tbsp. of the butter. Set aside.

In a medium mixing bowl add flour, baking powder, sea salt and sugar. Stir to fully incorporate ingredients.

Pour beer into dry ingredient mixture. Stir just enough to incorporate through the dry ingredients. Dough should be lumpy.

Add cheese to dough. Mix with hands just until cheese is dispersed through the dough.

Form into a ball. Take prepared loaf pan and place dough inside. Lightly press dough to form a loaf.

Bake loaf in preheated oven for 45 minutes for first bake.

Melt remaining butter in a microwave safe bowl or cup for 25-30 seconds on high.

Remove loaf from oven and carefully pour melted butter over entire loaf.

Return loaf to oven for 10-12 minutes. Crust should be golden brown and loaf should have a slight give when fully baked.

Place on cooling rack for 5-10 minutes before serving. ENJOY!

Monday, April 5, 2010

Scrumptious Citrus Chocolate Chip Scones


Chocolate & orange...perfect all by themselves, but such a scrumptious union of flavors when they are brought together.
 
It only seemed right that they should come together to make a perfect scone. I can't believe that I've never come across this combination in a scone before.

So let's get started by preheating the oven to 400°F. By the time your oven is ready, your scones should be in the shaping stage. (that's how quick and easy these are to make)


I grab my Kitchenaid mixer and use the paddle attachment to make this super simple dough. Start with 2 cups of all-purpose flour...


Add 1 Tbsp. baking powder...


And 1/4 tsp. baking soda...


Give it a quick stir (on LOW) just to get things mixed nicely...


Then 1 tsp. of sea salt...


We need a little sugar, so add 1/3 cup of granulated sugar. Give it another quick little stir to get all of that sugar incorporated.


Then take a small grater or zester and a medium sized orange...and start grating that wonderful skin releasing the orange's oils. Be careful not to zest the pith (white) of the orange though...we don't want that in our mix.


Give it a quick stir just to get the orange zest distributed through the flour mixture.


Time to turn the attention to the butter...COLD butter. Start by slicing 1/4" pieces of butter (or breaking them off)...


Then slice again into cubes. This will help it while mixing...cold cubes are better than cold slices.


Next, the cold cubes of butter go into the mixing bowl.


Mix on the lowest speed setting until pea sized balls begin to form. (about 4-6 minutes)


In a small mixing bowl add one egg....


Give that egg a little beating...


Measure out 3/4 cup of heavy whipping cream and add it to the egg.


Mix the egg and cream together.


Turn the mixer on the lowest speed setting, then add the egg & cream mixture to the dry ingredient mixture...


Make sure to do it on low speed so that the kitchen doesn't get a dusting.


Mix just until incorporated. The dough should be slightly sticky.


Then we just plop our dough out onto a lightly floured surface.


I like cutting my dough in half...then either using it to make half a batch of another type of scone (like The Keys' Key Lime Scones or Cranberry Orange Scones, which is what I'm doing this time)


or wrapping it in saran wrap (and then in a freezer bag) and storing it for later use.


Time for the CHOCOLATE!!! I love Ghirardelli's 60% Cocoa Chips...but if you have semi-sweet chocolate chips, they will work just fine as they do in this batch. For me, the darker the chocolate, the better...when I haven't already consumed them all.


Taking 1/2 cup of chocolate morsels, I give 'em a good chopping. Not too uniform though, leaving some larger pieces to pop up in the scones is really quite alright.


These little morsels get a quick toss in very little flour. Sifting chocolate slivers from flour is a bit difficult, so I just use 1/2 teaspoon of flour to start with and then add a little more if needed. (that way I don't have to sift the chocolate from the flour)


Pour the chocolate chips onto the dough and begin to quickly work the chips into it by folding & kneading. 

I tend to fold it in, then separate it into three balls, then fold those back in again. It doesn't have to be even or perfect... that's the beauty of scones.


Then press, or roll with a floured rolling pin, the dough into a 3/4"-1" thick slab. When doing this, Be sure to move the dough around so that the dough doesn't stick to the surface. Add flour to the surface area as needed.


Then take a biscuit or cookie cutter (I like the cookie cutters) and dip it into a little flour before pressing out the scones. This will allow the cutter to release the dough easily.


Place the scones onto a baking sheet lines with parchment paper or a silpat. If you don't have one, put it on your Wish List and broadcast it to everyone you know.


Next step, take an egg and a tablespoon of water and mix them to make an egg bath.
 

Then take that egg bath and with pastry brush…


Apply it to the top of each scone.


The last step before putting them into an oven…sprinkle the top of each scone with sugar (granulated or raw).


Then into the preheated oven (400°F) for 15-20 minutes. (time varies by size & thickness, these took 16 minutes)


Remove the scones from the oven once they are golden brown and firm to the touch. Move the scones to a cooling rack and allow them to cool for 10-15 minutes.


While cooling, take half of the orange that was used for zesting and juice it.

Oh yeah, we're going to make an orange glaze!


Be sure to strain out any seeds and pulp...they make the glaze not so pretty.


Measure 4 Tablespoons of orange juice and add 2 1/2 cups confectioner's sugar (powdered sugar) to the orange juice.


Then I start by using a rubber spatula or spoon to mix the sugar into the juice...followed by a whisking to get all of the little balls of sugar broken up and incorporated.


And when it’s done, there is a wonderful glaze that is ready to drizzle over the scones. Drizzle…just enough to make them look even more inviting and pretty.

Be sure to place a cutting board or parchment paper under the cooling rack for this step…or your counter will become extremely sticky welcoming every ant in the neighborhood.


Just look at how desirable these little beauties are! And did I mention how amazing they smell?


Now that you've seen how easy it is...go make some for yourself!