Showing posts with label Dinner. Show all posts

Wednesday, March 6, 2013

Grandma Elly's Norwegian Meatballs


When I was a little girl I couldn't wait for visits to my Father's parents' home. My Grandmother would never tell us when she was going to make them, but every time we got there for dinner I was hoping that the first step through the door would bring the wonderfully comforting aroma of her Norwegian Meatballs.

Basically, Norwegian Meatballs are the same as a Swedish Meatball, but my Grandma would never agree to that statement...she is Norwegian, therefore what she makes is Norwegian. By far, this was my favorite dish and one that I would always beg for my Grandma Elly to make for us.

Friday, February 15, 2013

"Sloppy Jan's" ~ Real Homemade Sloppy Joe's

 
Growing-up I used to think that my mother made Sloppy Joe's from a can...oh, I was so very wrong.  I bought a can and it was  NOTHING like my Momma's version and definitely as good as her Sloppy Joe's.
 
So, since my Momma's name is Jan, we're making "Sloppy Jan's". Only 9 ingredients, and 6 hamburger buns. A very simple one to do...and I guarantee you won't want to go back to canned Joe's ever again. (You can't pay me to)
 
One of the added benefits of this recipe is that you are ready to eat in less than 30 minutes! Perfect for busy moms & dads who are just too worn-out to think about dinner...or singles who like to cook once and eat leftovers for 2-3 days.


Here we go! I start by preheating my skillet (a deep skillet) over medium high heat. Add my 1 1/2-2 pounds of lean ground beef. (the sauce can be adjusted for thickness if you are in the 1 1/2 to 2 pound range, simply by adding water to thin it, or cooking a little longer to reduce it)
 
 
After allowing my meat to brown and render off some fat, I add my garlic salt and ground black pepper. Then it just simmers for about 5 more minutes. I always check to see that there isn't any pink in the meat before spooning off the rendered fat.


Grabbing my trusty tablespoon and a spare tea cup, I remove the rendered fat leaving approximately 2 tablespoons worth in the skillet. Let's face it, a Sloppy Jan needs a little fat.
 

I then add in a couple of cups of ketchup. Sometimes I just dump in the full 24-oz. bottle. (Tip: when you see ketchup on sale, grab 4 or 5 24-oz. bottles for future use) 


Now I add my favorite onion soup mix...Lipton Onion Soup Mix! I love this stuff! It's good for so many things other than just soup, but we'll get into that at a later date. Give it a little stir to make sure that the soup mix is well distributed in the skillet. 


Allowing my soup mix to combine with the ketchup, I go grab the next several ingredients out of the pantry. First I add the rice vinegar. Apple cider vinegar can be used too, the amount of it and the total sugar added would just have to be tweaked, but I've gotten the best results from plain old rice vinegar.


Then I add the light brown sugar. I like this better than dark brown sugar, because it just seems to be easier to make tasting adjustments if necessary.   
 
 
Now for the kicker...Worcestershire sauce! You may not be able to say it, but this sauce is an amazing addition to so many recipes. And necessary to get just the right flavoring in this one. Without it, there is a huge void. Let everything simmer for just a bit longer...then grab your plate, hamburger bun and start serving it up!

 
I am forever teased by Charming for the fact that I eat "sloppy" food with a fork...I just would rather avoid orange stained fingers and face.

**Also great alone in a big bowl with Fritos**   


Love this blog? Please click the Top Mommy Blogs banner every day! This casts a vote for my blog today and helps me continue to get great products to share with you! You can vote daily! Thank you so much!

Top Mommy Blogs - Mom Blog Directory

Wednesday, October 31, 2012

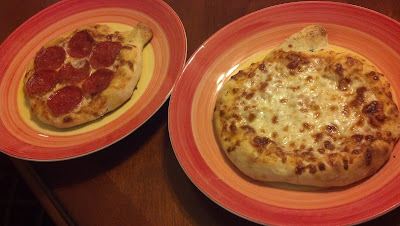
Personal Pumpkin Pizzas


It's a little chilly outside, a little breezy and also happens to be Halloween.  So in the midst of it all I decided to have a little helper make some very festive personal pizzas...Pumpkin Shaped! These little personal pumpkin pizzas are such a fun way to have little ones enjoy Fall.  And they really are easy to do too. 

Preheat the oven to 485°F.  Start by taking a little butter and smearing it into the shape of  two pumpkins onto a cookie sheet. The base of these pumpkins will be either store bought pizza dough or homemade dough. (a typical store bought round of dough will make 2-3 personal pizzas)

To keep the dough from sticking to your hands simply coat your hands with either olive oil or a little butter.  Separate the dough into baseball sized rounds.  Then press a ball of dough and form it into the rough shape of a pumpkin.  To make the stem, pull gently on the dough and pinch into the shape desired.


Top dough with pizza sauce (see recipe below), shredded mozzarella cheese and your favorite toppings.

Place pizzas in the oven and set a timer for 8-10 minutes.  Check pizzas at the 8 minute mark.  Gently slide a spatula under the edge of a pizza and check the bottom of the pizzas.  They should be lightly browned.  Continue to check every minute until the bottoms are golden brown.  Remove from oven and place on a cooling rack for 5-10 minutes before serving to little ones.

Tip: Melt a tablespoon of butter in a microwave safe bowl and add a teaspoon of garlic salt. Brush over the edges of each pumpkin before baking.


*******************
Pizza Sauce
Prep Time: 8 minutes

Ingredients:
1 (6 oz.) Can of Tomato Paste
1/4 Cup Extra Virgin Olive Oil
1/3 Cup Water
1-2 Garlic Cloves, minced
1/2 Teaspoon Italian Seasoning (or 1/4 teaspoon each of dried Oregano & Basil)
1/2 Teaspoon Sea Salt
OPTION: If you are not a fan of fresh garlic, or just don't have any, then use 1-2 teaspoons of garlic salt and bypass adding any sea salt.

Directions:In small bowl, or 2 cup measuring cup, empty can of tomato paste. Add extra virgin olive oil a little at a time, mixing it in completely in between each pour. Add water a little at a time, mixing it in completely in between each pour. Depending on the consistency that is preferred, more water can be added to thin the sauce, less to thicken it. Add Italian seasoning & sea salt. Mix until well incorporated. Refrigerate any unused portion for up to 5 days.

Can also be warmed and used as a dipping sauce for breadsticks.

Saturday, July 14, 2012

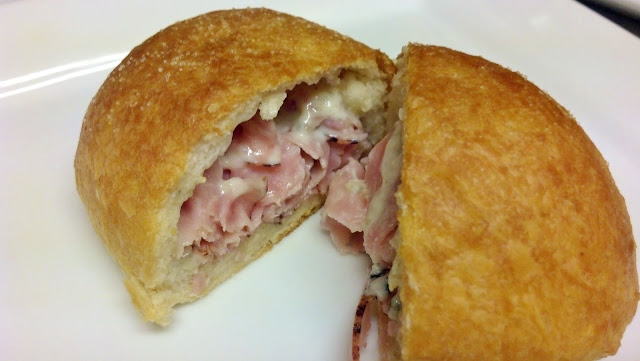
Ham & Gorgonzola Cheese Stuffed Buns


These stuffed buns are so much better than those you can pick up in the frozen food section.  Why?  They're fresh baked and you get to fill them yourself with as much meat as you can pinch into that bun.

Perfect as a lunch or dinner main dish...okay, you might need 2 per person for dinner.  OR, if you have a get together planned, turn these little beauties into 2-bite appetizers!


Ham & Gorgonzola Cheese Stuffed Buns

Preheat Oven:  375° F
Prep Time: 15 minutes
Bake time: 12-15 minutes
Level: Easy

Ingredients
8 Pillsbury Grands Flaky Layers Buttermilk Biscuits
Black Forest Ham, thin sliced (lunch meat is fine)
1 Tbsp. Gorgonzola Cheese
1/2 tsp. Dijon Mustard, per biscuit (optional)
2 Tbsp. Butter, melted


Directions
Take one biscuit and flatten it by pressing with the palm of your hand or fingertips.
Place the Gorgonzola cheese in the center of the biscuit, leaving a 1-inch border around the biscuit edges clean.
Place dijon mustard on top of the cheese. (this step optional)
Roughly chop ham and place on top of cheese.
Bring up the edges of the biscuit, gather and pinch together sealing the fillings inside.

Place on a lined baking sheet (SILPAT, foil or parchment paper) allowing 1-inch minimum in between each biscuit.

Brush melted butter over the top of each biscuit. Lightly season with salt. (salt optional)

Bake for 12-15 minutes until tops are golden brown. (15 minutes needed if using SILPAT lining)

Serve & enjoy!

Tip: Cut biscuits in half before assembling and form into a disk to create smaller biscuits for appetizers or kid-sized bites.

Thursday, April 26, 2012

Chicken Stroganoff with Bow Tie Pasta


This dinner is such a great comfort food and so easy to prepare. A chicken twist to the traditional beef stroganoff!


Start by slicing breasts in 1/4" thick slices and halve the longer pieces.


Over medium heat, preheat a large skillet with 1 tablespoon canola oil.  Once the oil begins to ripple, add chicken and onions/onion powder.


Allow the chicken to sizzle & simmer until fully cooked, stirring often.  You don't want to see any pink in that chicken!


While the chicken is cooking, in a large pot bring water to a boil.  Once the water is boiling, add some salt.  This is the time that you get to add flavor to the pasta/noodles.  Then the pasta needs to hop in!  Give it a stir so that nothing sticks together and occasionally come back for another stir while it cooks.  Cook according to the package directions...I prefer to have it FIRM for this dish.


While pasta is cooking, in a medium bowl combine cream of mushroom soup, sour cream and milk.


Once chicken is fully cooked and pieces are no longer pink, add mixture. Stir in garlic salt and allow to simmer 5-8 minutes.


Simmer, simmer, simmer...


Then spoon over drained pasta & ENJOY!  (Optional: Top with black pepper to taste)


Chicken Stroganoff with Bow Tie Pasta

Prep Time: 20 Minutes
Cook Time: 20 Minutes
Servings: 6-8
Level: Easy

Ingredients:
4 skinless, boneless chicken breast halves
1/2 cup chopped onion OR 1/2 tsp. onion powder
2 - 10 3/4 ounce can condensed cream of mushroom soup (or 1 family size can)
1/2 cup milk
1 package dried bow tie pasta (or wide egg noodles, traditional)
8 tablespoons dairy sour cream (or 8 oz. container)
1/2 teaspoon garlic salt (or 1/4 teaspoon garlic powder and 1/2 teaspoon salt)
Freshly ground black pepper (optional)


Instructions:
Slice chicken breasts into 1/4" wide strips. (along the width of chicken breast, not length).  Preheat a large skillet with 1 tablespoon canola oil over medium heat. Add chicken and onions/onion powder. Allow to simmer until fully cooked, stirring often.

In a large pot add 6 cups water and bring to a boil over high heat.  Once boiling, add salt (to flavor pasta) and pour in pasta. Cook according to package directions. Drain.

While pasta is cooking, in a medium bowl combine cream of mushroom soup, sour cream and milk. Once chicken is fully cooked and pieces are no longer pink, add mixture.  Stir in garlic salt and allow to simmer 5-8 minutes.

Spoon stroganoff mixture over pasta to serve. Add black pepper to taste.

It's National Pretzel Day!

I have always been and will always be a big fan of The Pretzel.  So, Happy National Pretzel Day!

In honor of this day set aside to pay hommage to that salty, sometimes sweet, often savory little twisted rope of bread we affectionately call a pretzel, I have provided some recipe links for all to enjoy.

And a quick little instructional session for making your own pretzels from Food Network's own Alton Brown.

Now it's time to get your pretzel on!

Sweet & Savory Pretzel Recipes from AllYou.com

Photo By BrownEyedBaker.com
Toffee Pretzel Bark ~ BrownEyedBaker.com (click here for all recipes pretzel related)

Strawberry Pretzel Salad ~ AddAPinch.com
Pretzel Turtles ~ Allrecipes.com

Photo By John Kernick
Hot Dogs with Cheddar and Sauteed Apple ~ Delish.com (click here for more pretzel related recipes)

Double White Chocolate and Pretzel Peanut Butter Cookies...with Sea Salt ~ PickyPalate.com

Everything Soft Pretzels ~ FoodieWithFamily.com

Sunday, January 1, 2012

Main Dish

BREAKFAST
From savory to sweet, recipes that are perfect for pleasing your tummy in the morning.

Apple Cinnamon Pancakes ~ Working a little bit of apples into breakfast
Breakfast Melt ~ Grilled cheese sandwich with eggs & bacon
Cocoa & Peanut Butter Pancakes ~ Like having a sundae for breakfast
Eggnog French Toast ~ A wonderful way to enjoy eggnog in the morning
Fruit & Nutty Cream of Wheat ~ My chilly morning Go-To comfort food
Nutty Spiced Cranberry & Golden Raisin Oatmeal ~ So hearty & sweet...a perfect start for the day
Stuffed French Toast with Pineapple & Sweet Cream ~ Not an ordinary French toast...there's pineapples for Pete's sake
Stuffed French Toast ~ Divine Strawberry & Nutella Stuffed French Toast ~ Nutella is the star ingredient
Spiced Monkey Bread ** ~ An amazingly addictive twist on the cinnamon roll **No high altitude changes necessary

Syrups
Tangy Apricot Syrup ~ A tangy apricot syrup made with fresh apricots

LUNCH
I like to change-up lunch time...who wants the same old ham sandwich or hamburger day-after-day? Not my family. So here are a few of my lunch time recipes that are sure to please...most are also perfectly acceptable for dinner time too!

Chicken Salad Club & Baby Spinach Sandwich ~ A little dress-up for an everyday chicken salad sammy
Chile Verde Chicken Sammy ~ A bit of a sloppy joe but chicken chile verde style
Curried Chicken Sammy ~ When chicken salad just needs a little kick
Gorgonzola Hamburger ~ Meaty, full flavored burger
Proscuitto Wrapped Hot Dogs ~ Proscuitto brings a great level of crunch & flavor to these dogs 
Pulled Pork Sandwiches ~ An easy hassel-free recipe
“Sloppy Jan’s” ~ Real Homemade Sloppy Joe’s ~ One of my childhood favorites…not out of a can


DINNER
Some of my tried and true dinner recipes...my hubby, Charming, has given his "thumb's up" on each of these.

Pulled Pork Sandwich w/Bacon & Cheese Fritters
Chicken Stroganoff with Bow Tie Pasta ~ Creamy chicken & pasta comfort food

Chile Verde Con Pollo ~ A chicken version of the traditional pork chile verde

Machaca (Mexican Shredded Beef) ~ An amazingly tender & flavorful shredded beef perfect for tacos & burritos

Porchetta & Roasted Vegetables ~ A flavorful traditional Italian pork roast. My modified version of Chef Anne Burrel's recipe

Prosciutto Wrapped Hot Dogs ~ Prosciutto gives these dogs an extra crunch and great flavor

"Gobbled Up" Turkey Casserole ~ A great way to use leftover turkey


Short Ribs & Penne Rigate

Grandma Elly's Norwegian Meatballs ~ My 100 year-old Grandmother's recipe!

Pulled Pork Sandwiches ~ An easy, hassle-free recipe

Sheppard's Pie With Cheesy Potatoes ~ An ultimate comfort food for the meat & potato lover

Simple Pinto Beans ~ Low prep time that allows great flavorful beans 

"Sloppy Jan's" ~ Real Homemade Sloppy Joe's ~ One of my childhood favorites...not out of a can 

Quick Chicken & Cheese Casserole ~ Comfort food that is perfect for a family meal or kiddle lunch

Southwest Chicken & Chorizo Soup
SOUPS
Italian Chicken & Tortellini Soup ~ An Italian twist to chicken noodle soup 

Southwest Chicken & Chorizo Soup ~ A hearty, spiced soup


Sunday, November 6, 2011

Gobble Gobble (Turkey) Casserole

6242a
I'm sure that I am not the only woman who tries to find other ways to enjoy the leftovers of a Thanksgiving or Christmas Turkey. Nah, I can't possibly be. So I put my "little grey cells" to work, as my favorite detective Hercule Poirot would say, and then it hit me! Not a turkey soup...no, I've had plenty of that through the years, it's to be expected...instead it occurred to me that a casserole was the way to go. So here we go! 6222a
Here we have the main players of this production. Go ahead and preheat the oven to 350°F. 6208a
While the oven is getting warmed up, grab a medium saucepan and fill it with 3 cups of water. Bring the water to a boil over high heat.
6202a
Since a watched pot never boils, start tearing, cutting or shredding 2 cups of turkey meat. White meat, dark meat or both...it's your choice. Mine? White meat everytime. Place the turkey meat into a 9x13 baking dish.
6203a6204a
It's time to grab your knife! I like to buy pre-sliced mushrooms, it's so convenient, so all that's necessary now is to slice them into halves. If there are a few peices that are too big when halved, then go ahead...get crazy and cut them into quarters! Place the mushrooms into a medium sized bowl.
6207a
Now grab your carrots. (I always grab more than needed starting off) Again, take a little bit of the work out of your day...when you hit the store, grab the bag of peeled carrots. Let's slice these beauties into 1/4" thick disks. Perfectly bite-sized. Add the carrots to the mushroom bowl. And set aside. Let's check in on our water...
6209a
It's ready for action!
6210a
Add 1/2 teaspoon of sea salt to the water. This is the only chance there is to flavor the pasta itself. 6211a
6212a
Pour in 1 1/2 cups of mini pasta. I used mini wheels. (my kiddles love the mini wheels) Cover and let cook for 5 minutes on medium heat.
6213a
Be sure to set your timer...we don't want the pasta to cook completely. 5 minutes is all that's needed to reach al dente. This timer annoys me more than the one on my stove so it really gets my attention. 6215a
Back to our casserole assembly...in a medium bowl mix 2 cans of cream of mushroom soup... 6216a
Add 1 teaspoon of poultry seasoning,
6217a
1/2 teaspoon sea salt,
6218a
1/4 teaspoon black pepper,
6219a
 1/8 teaspoon paprika.
6221a
Stir until it's creamy and everything is well mixed.
6223a
Time to add our milk! Add little by little, stirring carefully so things don't slop all over you. (this is a problem that I battle all the time)
6220a
Oh! Time to get our pasta off of the stove! Have your strainer ready and place it in the sink. Step back as you pour the pasta into the strainer...unless you are in need of serious facial. Give the pasta a little cold shower...to stop the cooking process. It will finish cooking in the oven.
6225a
Okay, back to the casserole dish. Here we have our turkey...looking a little lonely.
6226a
Perhaps a little pasta will help...looking better, but not there yet. 6227a
Let's add the carrots and mushrooms....getting there. 6228a
Time to mix the turkey, pasta, carrots and mushrooms with your hands to insure that everything is well distributed. (plus it's just another excuse to get your hands in there) 6229a
Ah, yes. Much better. Now we're getting somewhere. 6230a
Pour the soup mixture over the turkey, carrots and mushrooms... 6231a
mix well and spread the mixture evening in the casserole dish. 6232a
Oh it looks so good already!
6233a
Check out this creamy goodness...it's just screaming to be eaten! And we could stop here...but why do that?
6234a
Time to mix our toppings! Here is our next cast of characters. 6235a
Pour out 1 cup of French's French Fried Onions onto the cutting board. Here is it.... a chance to get some agression out...perhaps pent up from those pesky laundry stains you just can't seem to get out. Perhaps not. Regardless, these french fried onions are in need of a good beating. Don't resist...how many times does that mallet actually get to come out and have some fun? 6236a
Once the onions have been pummeled into crumbs, pour then into a small mixing bowl. Then grab 1 cup of Italian bread crumbs and pour them in aswell. As you could see before, I keep quite a bit onhand. Oh how I love bulk bin shopping.
6237a
Pour our toppings over the casserole mixture.
6238a
Carefully smooth the toppings evenly, trying not to uproot any goodies along the way. 6239a
Since a little more of a crunch is always nice, drizzle 3 tablespoons of extra virgin olive oil on top of the toppings.
6240a
Now it's time to use a bit of a gently touch. Just mix the oil in enough to get some of the bread and onion crumbs mixed in. As you can see, I've chosen to use a table knife rather than a spoon...I do not want to accidently start scooping things up to the top. And mixing it all into the casserole is definately not what the goal is here.
6241a
Okay. Ready to hope on into the oven. All that's needed is a little covering of aluminum foil first. Bake for 30 minutes covered. Then uncover the casserole and bake an additional 25-30 minutes (depending on your oven) so the bread topping can get a little crunchy. 6243a
It's time! Pull that badboy out of the oven and let it set for 10 minutes. This is the point when my Charming came over looked at it with a questionable expression on his face (as he knew that I was experimenting with a new recipe) and said, "Well, is this it? Can I try it? It smells good." (pick me up off the floor!) This dish is now a very welcomed addition to our menu. Enjoy!

Gobble Gobble (Turkey) Casserole
Ingredients:
2 Cups Turkey, dark and/or light meat pulled or shredded into bite size peices
2 Cups Sliced Mushrooms, halved
1-1/2 Cup Sliced Carrots, 1/4" thick
1 Cup Dry Pasta of your choice (mini pastas work best)
1 Teaspoon Sea Salt, Separated
3 Cups Water
2 - 10oz. Cans of Cream Of Mushroom Soup
1 Teaspoon Poultry Seasoning
1/4 Teaspoon Black Pepper
1/8 Teaspoon Paprika
1 Cup Whole Milk
Topping:
1 Cup French's French Fried Onions
1 Cup Italian Seasoned Bread Crumbs
3 Tablespoons Olive Oil

Directions:
In a medium sauce pan bring 3 cups of water to a boil over high heat. When water comes to a boil, add 1/2 teaspoon of sea salt and pasta. Cook for 5 minutes until al dente. (pasta will finish cooking in the oven) When pasta is ready, strain pasta & rinse with cold water to stop the cooking process. Set aside to finish draining excess water.

While pasta is cooking, tear, cut or shred 2 cups of turkey meat. Set aside in a 9x13 casserole dish.
Slice peeled carrots into 1/4" rounds. Set aside in a medium bowl. Slice mushrooms into halves. (quarters for large sections) If your mushrooms are not pre-sliced, then start by slicing them into 1/4" slices, then halve or quarter accordingly. Place in the bowl with carrots.

In a seperate medium bowl combine soup, poultry seasoning, black pepper, paprika and milk.
Pour pasta into casserole dish. Mix with turkey pieces. Add carrots & mushrooms and mix again, distributing ingredients evenly. Add soup mixture to casserole dish. Mix ingredients well and spread evenly.

With a mallet, crush the French's Fried Onions until they become crumbs. Pour into a small bowl and mix with the bread crumbs. Drizzle olive oil over the breading mixture and mix gently. Pour breading mixture evenly over the top of the casserole. (if prefered, pour dry breading over casserole and lightly coat with olive oil cooking spray)

Cover casserole with aluminum foil and place in oven. Bake for 30 minutes. Cook for another 25-30 minutes (depending on the oven) uncovered to allow breading to toast. Remove and let casserole with for 10 minutes before serving.

Makes 6-8 servings.