Showing posts with label Dessert. Show all posts

Friday, July 17, 2015

Brownie Bowl Sundaes


Brownie Bowl Sundaes...does it get any better than this on a Summer night? Yeah, there are brownie sundaes, but these just seem so much more fun.  The little girl in me just wants to devour that whole plate full.

I came across this dessert idea as I was cleaning the ridiculous pile of papers, magazines and mail on my table. I swear that paper is my nemesis!


Wednesday, January 28, 2015

Super Bowl Grub ~ SEAHAWKS BABY!!


My husband is a HUGE Seahawks fan...has been since he was in the 8th grade.  So, needless to say that he can't wait for Super Bowl Sunday this year.  We'll all be decked out in blue and green, yelling at the TV like people who have completely lost their minds.  Fun :)


In the midst of the chaos that is sure to ensue, we will be munching on some seriously yummy eats.  Here's a round-up of some great recipes from around the blogsphere for you to enjoy while you watch the game...or retreat to another area of the house.  I'll be following the ball and then retreating during the half time show...Katy Perry? 

Thursday, November 6, 2014

Thanksgiving Goodie Ideas ~ We All Need Them

Before I know it, Thanksgiving is going to be crashing through my door wanting to know where to land.  This is my way of being prepared and having plenty to occupy my kiddles as the holiday approaches.


In my search for all things Thanksgiving, I have come across some great blog sites.  Because I'm so nice, and I know that there are other mommies out there looking for activities and recipes too, I'm going to share them with you.  

Tuesday, November 26, 2013

What's On YOUR Thanksgiving Table This Year?

 
With Thanksgiving knocking on my door, I have been going through tried and true recipes for appetizers, sides and desserts.  Here are the delectable dishes that will be gracing my family's table this Thanksgiving Day.  (Why is the turkey missing?  My mother-in-law has the task of turkey and ham this year.)

Feel free to leave some of your favorite recipe links in the comments below. (I love a good recipe)

Wishing you and your family a wonderful and memorable Thanksgiving Holiday!

APPETIZERS

Prosciutto & Cheese Rosettes ~ The Chatty Mom

 
Bacon Wraps ~ Garlic Herb ~ The Chatty Mom ~ Addictive bites


SIDES

Homemade Cranberry Sauce ~ The Chatty Mom ~ So easy, SO good...You'll never go back to the can!


Photo Source: Ree Drummond ~ ThePioneerWoman.com
Whiskey Glazed Carrots ~ The Pioneer Woman's recipe.  Ahhh-MAzing!

Photo Source: AvocadoPesto.com
Green Beans with Shallots and Pine Nuts ~ Avocado Pesto's recipe - Great alternative to the traditional green bean casserole


Sweet Potato Banana Crumble Casserole ~ The Chatty Mom ~ Great as a side OR a dessert.  I top it with vanilla frozen yogurt and serve as dessert! (my oldest daughter's favorite dish)


DESSERTS

Photo Source: PickyPalate.com
Cinnamon Roll Pumpkin Vanilla Sheet Cake ~ Picky Palate ~ A new recipe that I can't wait to have!)
 
Photo Source: Foodnetwork.com
Pumpkin Chocolate Chip Cookies ~ Food Network ~ My family LOVES these...without the chocolate chips.  Soft & chewy and SO good!


Friday, March 1, 2013

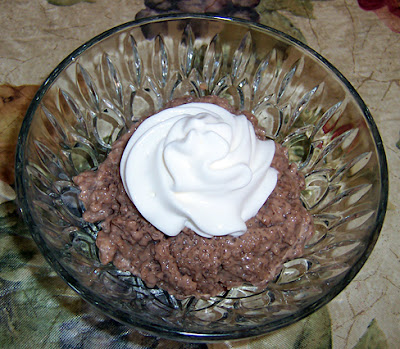
Bailey's Irish Cream & Chocolate Tapioca Pudding


In the spirit of St. Patrick's Day I decided to try a little something different. 
 
Since I was a little girl I have loved tapioca pudding...there's just something about that texture you get from the tapioca pearls. (and they're like chewing on little gummy bears too) Couple that with my introduction to the flavor of Irish Cream when Jelly Belly had their Irish Cream flavor jelly beans. As for chocolate, well let's just say that I'm pretty sure that there is a percentage of chocolate flowing through my veins on a regular basis.

Thursday, February 21, 2013

FREE Family Circle Recipes!

 
Have you grabbed your copy of these recipes yet?!   12 delectable recipes just waiting for you to discover.

I can't wait to make some of these this weekend...the pictures alone are fantastic!
 
FREE Family Circle recipes to keep your tummy happy.
Click HERE!

Love this blog? Please click the Top Mommy Blogs banner every day! This casts a vote for my blog today and helps me continue to get great products to share with you! You can vote daily! Thank you so much!

Top Mommy Blogs - Mom Blog Directory

Tuesday, February 12, 2013

Chocolate Cream Cheese Buttercream Frosting


This decadent cake is topped with my Chocolate Cream Cheese Buttercream Frosting. Since I am not a fan of frostings that are grainy & made with shortening, I always go for something that is soft, creamy and preferably fresh.
 
If you have 5 minutes, then you have enough time to make this delicious shortening-free frosting. All you need is 5 ingredients!   Yes, you read this correctly...only 5 ingredients.
 
Take 8 ounces of cream cheese and slice it so that your mixer has a little bit less work to do.


Add to that 1 bar of room temperature butter. Turn on the mixer and whip it until the cream cheese and butter are nice and fluffy.


Add 1/2 cup of confectioner's (powdered) sugar. Do this a little at a time or else you're going to have sugar flying everywhere...and I do mean everywhere.
 
Time to grab the cocoa powder! I love cocoa powder...you can adjust the sweetness to be as dark/bitter as you want or as sweet/milky as you like.
 
 
So here I add 2 tablespoons of cocoa powder. If you like a richer chocolate flavor, add an additional tablespoon of cocoa powder.
 
While the mixer is doing its thing, I add 1 teaspoon of vanilla extract. Then continue to whip on low speed until most of the white has been combined and is that beautiful chocolaty color.


Now, take a little taste just to see if it is as sweet as I like it....and since this was for my daughter Grace's birthday cake, I added an additional tablespoon of confectioner's powdered sugar.
 
 
Let the mixer do it's thing and when everything is beautifully blended you are ready to frost whatever is waiting on the counter next to you.
 
 
Tip: When frosting cupcakes, use a sandwich baggie to apply the frosting. Just snip the corner of the baggie and you have an instant pastry bag.

Love this blog? Please click the Top Mommy Blogs banner every day! This casts a vote for my blog today and helps me continue to get great products to share with you! You can vote daily! Thank you so much!

Top Mommy Blogs - Mom Blog Directory

Thursday, February 7, 2013

Cream Cheese Buttercream Frosting

 These cupcakes are topped with my Cream Cheese Buttercream Frosting. I am not a fan of frostings that are grainy & made with shortening. So I always go for something that is soft, creamy and preferably fresh.
 
If you have 5 minutes, then you have enough time to make this delicious shortening-free frosting. All you need is 3 ingredients! Yes, you read this correctly...only 3 ingredients.
 
 
Take 8 ounces of cream cheese and slice it so that your mixer has a little bit less work to do.
 

Add to that 1 bar of room temperature butter.
 

Turn on the mixer and whip it until the cream cheese and butter are nice and fluffy.
 

Add 1/2 cup of confectioner's (powdered) sugar. Do this a little at a time or else you're going to have sugar flying everywhere...and I do mean everywhere.
 

Let the blender do it's thing and when everything is beautifully blended you are ready to frost whatever is waiting on the counter next to you.
 

In this case, I frosted some Princess Cupcakes for my daughter's school birthday party. 


Tip: When frosting cupcakes, use a sandwich baggie to apply the frosting. Just snip the corner of the baggie and you have an instant pastry bag.   

Cream Cheese Buttercream Frosting

Prep Time: 5 minutes 
Servings: Enough for 12 cupcakes 

Ingredients: 
8 oz. Cream Cheese 
1 stick Butter, room temperature 
1/2 cup Confectioner's Sugar (powdered)     

Instructions: 
In a large mixing bowl add cream cheese & butter. Whip on medium speed until light and fluffy. 

Reduce speed to low, add confectioner's sugar, a little at time. Whip until well incorporated. 

Ready for frosting!  Tip: When frosting cupcakes, use a sandwich baggie to apply the frosting. Just snip the corner of the baggie and you have an instant pastry bag.   

Refrigerate if not being used immediately. Allow to come to room temperature again before using.

Pockets of Love ~ Cherry "Valentine Love" Pies

I love baking up little surprises for my family.  It's very rare, like once in a blue moon rare, that I make any pies...my skills seem to be best suited for baking cookies, brownies & cakes. 

However, I have heart shaped cookie cutters...

and I have pie crust on hand...
 
therefore I must make a little pocket of love to share with those I love most!

Here is one of the simplest recipes that you can have to make little hand pies of love for your family. And it's a great way to get your little kiddle into the kitchen for some baking one-on-one time.


Gather a few items to get the ball rolling. See recipe for additional optional ingredients.


Start by cutting pairs of shapes with a cookie cutter.


If you are like me and like a little decoration on top, cut out a few small hearts as well.


Then place some of the cutouts on a prepared baking sheet. (lined with parchment paper or a silpat)


Spoon filling onto the center of a dough cutout.  I kind of over did this one...go a little lighter on the filling than I did here or it will be difficult to seal the edges.


Place another dough cutout on top.

Press with a fork around the edges to seal.  As you can see, some of the filling oozed out on me...as long as you seal it, your pie will be fine. (this comes from me not baking pies more than once in a blue moon)

Brush the top of the pie with egg white.


Since I don't like to be plain...Place decoration on top & brush with egg white as well.  Then sprinkle raw sugar on top to finish it off.


Into the oven it goes for 12-15 minutes.  Out it comes beautifully golden brown (and this one oozing with filling).  The smell, oh the smell!


After about 2 minutes, onto a wire cooling rack for another 10 minutes. And if you're making these for adults and kiddles, then isn't this perfect?! Larger pies for the adults and smaller ones for the kiddles.  Confession must be made, I couldn't wait more than 5 minutes to take a bite.


Perfection comes with a scoop of vanilla bean ice cream! 
 

Cherry Valentine Love Pies

Prep Time: 15 Minutes
Bake Time: 12-15 Minutes
Level: Easy
Yield: 4 Large & 4 Medium Pies

Ingredients
1 pkg. Pillsbury Pie Crusts (2 rounds)
1 can Cherry Pie Filling
1 Egg White
Raw Sugar

Optional Ingredients:
1Tbsp. Sugar
1 tsp. Light Brown Sugar
1/4 tsp. Cinnamon
1/8 tsp. Nutmeg
A Pinch of Cloves, ground

Instructions
Preheat oven to 375°F. Line baking sheets with parchment paper or silpat.

Unroll one pie crust onto parchment paper or cutting board. Using large & medium heart shaped cookie cutters, cut out 2 heart shapes for each pie. (top & bottom) Repeat for second pie crust.
Optional: Using a small cookie cutter, cut out individual hearts from scrap dough for decoration

Place dough cutouts onto the baking sheet. Take pie filling and spoon 2-3 teaspoons of filling onto the center of one heart. Place another (same size) cutout on top. With a fork, press around the edges to seal.

With a pastry brush, brush egg white over the top of each pie. If adding a small heart on top for decoration, place and brush with egg white as well.

Sprinkle raw sugar over the top of each pie.

Bake for 12-15 minutes, until crust is golden brown. Keep an eye on them to avoid burning.  Baking times vary by oven.

Allow to cool on baking sheet for 2 minutes. Transfer to wire cooling rack for additional 10 minutes.
Serve warm or seal in airtight container and store in refrigerator of up to 3 days.

Need heart shaped cookie cutters?


Tuesday, February 5, 2013

Exceptional Chocolate Chip Cookies


My mother had a tradition of baking chocolate chip cookies whenever it rained. So many days I would run home from the bus stop because I knew that there would be warm cookies there welcoming me home. 
Those were sweet memories...and now I am making it a point to create similar memories with my girls on rainy days.  My husband welcomes rainy days and insists that it need not be raining to do a little baking.

Here is the recipe that we have used for over 30 years...and sometimes we are lucky enough to have our favorite mouse show up on the cookie sheet. If you're wanting to see this guy when you pull your cookie sheet out of the oven, just allow a little bit of over crowding to take place. (works every time)
Of course you have to have a glass of milk there to keep a cookie company, right? Doesn't this cookie just look ridiculously tempting?  It beckons your sweet tooth, "Come, just a little nibble."  And then you're hooked!
I hope that you and your family enjoy them as much as my family has all these years.

Exceptional Chocolate Chip Cookies
Prep Time: 15 minutes
Bake Time: 10-13 minutes
Yield: Approx. 2 dozen cookies

Ingredients
2 1/4 cups Flour, all-purpose 
1/2 tsp. Baking Soda
1 cup (2 sticks) butter or margarine, softened
1/2 cup Granulated Sugar
1 cup Light-Brown Sugar, packed
1 tsp. Salt (cut in half if salted butter is used)
1 1/2 tsp. Vanilla Extract (2 tsp. if opting out of the almond extract)
1/2 tsp. Almond Extract (optional)
2 Eggs, extra large
1 1/2 cups (12 ounces) semi sweet chocolate chips or 60% cacao chips
Tip: Add 1 Tbsp. honey for a chewier cookie & add 2 Tbsp. Flour

Instructions
Preheat oven to 325°F.

In a medium bowl, whisk together flour and baking soda. Set aside.  High Altitude: Add 2 Tbsp. additional flour

In a large bowl, add butter and sugars.  Mix together until light and fluffy, about 2 minutes. 

Reduce speed to low. Add salt, vanilla, almond extract and eggs. (if choosing to do so, add honey at this point)  Mix until well combined.

Mix in  flour mixture.  Once incorporated, stir in chocolate chips.

Drop tablespoons of dough onto baking sheets lined with parchment paper or silpat/non-stick baking sheets. Space dough two-inches apart.

Bake for 12-15 minutes.  Let cool on the baking sheets for 2 minutes. Move cookies onto wire cooling racks.  Allow cookies to cool completely. Or enjoy warm.