Friday, November 30, 2012

So Much To Be Thankful For


As the month of November came to a close and the focus has gone from thankfulness to the hustle and bustle of Christmastime merriment, I have found myself (like many of you) taking time to notice the many things that I am thankful for each day during this past month.

The thing that holds the #1 position on my list of "Things To Be Thankful For" will always be GOD'S GRACE in the form of my savior, Jesus Christ.  When I think about all that Jesus went through out of such a deep love for us it is completely overwhelming to me.  It's bringing tears to my eyes as I write this.

When life is throwing obstacles into my path every day, my Lord is the one that I immediately turn to.  He is always waiting for me to come share my interests and burdens with Him...and waiting for me to release them to Him so that He can manage it all for me.

The beautiful family that I have been blessed with is the most valuable tangible thing in my life for sure.  There is nothing like looking into the eyes of my little kiddles and seeing how amazing they are.  Have you ever really starred into a your child's eyes and noticed how incredible they are? It's amazing how just that part of their body can completely blow me away. And, of course, there's the wonderful, loving, supportive husband that I have...I am SO blessed to be going through life with him.

All off the little things that we can easily forget about daily...our health, a roof over our heads, clothes, food, water.  This years super storm Sandy brought all of those little things (which really are big things) straight into focus.  I stress those little things to my girls everyday.  Everything else is icing and a blessing beyond the necessities of our lives.

The family and friends that are in my life...each one has imparted something special into my life.  There are no words to express how much I love them and value my time with them.  And time is going at lightning speed these days.  Don't ever forget to take the time to say "Hello" or "I love you"...you just might not have another opportunity to do it.

I hope that all of you had a wonderful month of Thanksgiving and wish that your Christmas season continues forward with blessing upon blessing.

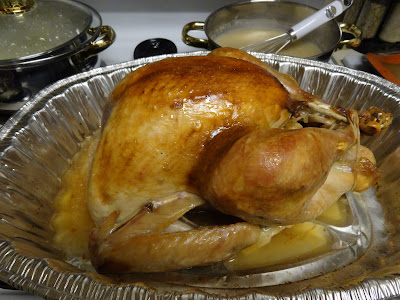
My Thanksgiving Bird Recipe

2 to 3 days before roasting ~ Begin thawing the turkey in the refrigerator or in a cooler kept at 38 degrees F.  SUGGESTION: Place the bird (packaged) in a sink and covering with cool tap water, turning the bird and changing water every 30 minutes for up to 6 hours. Dry off packaged bird, place in a large bowl or pan and place in the refrigerator. This will help to insure that in 3 days the bird will be ready for roasting.

Preheat the oven to 500 degrees F.

If you brine your bird, be sure to allow 8 to 16 hours. Alton Brown's recipe is excellent. (sometimes I do, sometimes I don't)  Be sure to also remove the neck & innards of the bird prior to brining.

Click HERE For Alton Brown's Brining Instructional Video.

For the brine:

  • 1 cup kosher salt
  • 1/2 cup light brown sugar
  • 1 gallon vegetable stock
  • 1 tablespoon black peppercorns
  • 1 1/2 teaspoons allspice berries
  • 1 1/2 teaspoons chopped candied ginger
  • 1 gallon heavily iced water
 

For the aromatics:

  • 1 Red Apple, sliced
  • 1 Orange, sliced
  • 6 sprigs Chives, halved
  • 1 cup Water
  • 2 sprigs Rosemary
  • 6 leaves Sage
  • 3 sprigs Thyme
  • 1 teaspoon Peppercorns
  • Canola oil
If not brining your bird, be sure to remove the neck & inners and rinse inside and out. Take a teaspoon of salt and rub the entire bird (inside & out), then rinse.  This helps to kill bacteria. Place the bird on roasting rack inside a half sheet pan and pat dry with paper towels. Combine the apple, orange and 1 cup of water in a microwave safe bowl and microwave on high for 5 minutes. Add aromatics to the turkey's cavity along with the rosemary, thyme, sage, chives and peppercorns. * OPTIONAL: At this point take 1 tablespoon of softened butter and rub it between the skin and breast of the bird. Tuck the tail and cross, then bind the legs of the bird. Tuck the wings underneath the bird and coat the skin liberally with canola oil. Roast the turkey on lowest level of the oven at 500 degrees F for 30 minutes. (if a 10-12 pound bird, roast for 20 minutes) Remove from oven and insert a probe thermometer into thickest part of the breast and reduce the oven temperature to 350 degrees F. Set the thermometer alarm (if available) to 161 degrees F.
Cover with saran wrap making sure to secure edges along the pan. (yes, that is a warehouse sized supply of saran wrap to the left)
Cover with aluminum foil, securing edges along pan. This will help keep moisture locked in!
Remove and unwrap the bird for the last 30 minutes of roasting.  Reserve some of the liquid for gravy at this point if desired.
A 14 to 16 pound bird should require a total of 2 to 2 1/2 hours of roasting. Remember, the temperature that needs to be met is 161 degrees F. If necessary, allow the bird to cook longer and check the temperature every 15 minutes until done.  If the bird is getting too brown, tent with aluminum foil to avoid bunt skin.
Let the turkey rest, remove saran wrap and loosely covered with foil or a large mixing bowl for 15 minutes before carving.

Enjoy!

Sunday, November 25, 2012

Baskin Robbins Buy One, Get One $0.99!

My Hubby's favorite ice cream stop has a deal for the end of your Thanksgiving weekend...as if any of us need any more sugar. 

But if your sweet tooth is screaming for more...
Hurry up and print your coupon for Baskin Robbins Buy One, Get One $0.99 deal!
Stop by Baskin Robbins Facebook Page to get yours!

However, this offer excludes Mini Soft Serve Parfaits.

Tuesday, November 20, 2012

Bacon Wraps ~ Garlic Herb

These are great for little get-togethers or for watching the game. (but if there are a few fans during the game night, you'd better be ready with A LOT of these bad boys...this recipe makes approx. 16 wraps)

I took my Auntie Laila's recipe for Crispy Pineapple Cream Cheese Bacon Wraps and decided to make another filling for them. Since I love using garlic, this was the perfect opportunity to once again work it into a recipe...and with bacon! It literally took me 15 minutes to make the filling and wraps. Then there is a little care put into the baking portion, which is between 25-30 minutes on a low broil. But aside from that, this really is an extremely easy appetizer to turn out...and everyone loves them!

I start by taking a brick of cream cheese and slicing it right down the middle...at the 4 ounce marker. This allows me to also have one ready to make the pineapple wraps aswell. (saving any amount time is golden to me)
Then I take 2 garlic cloves, really only 1 is needed, but since I love garlic (and it's really good for the heart) I go with 2 cloves, and put them in my trusty garlic press.

Mincing garlic just is not my favorite thing...kinda like chopping onions. If I have to I will, but if the press is handy then there we go!

Mash it up a bit just to get those garlic juices going in the cheese.

Next I add in the onion salt...since it brings another bit of flavor to the table instead of just plain sea salt.
 
Now for the herbs in the "garlic herb" part of the cheese. A little bit of dried oregano...

dried parsley flakes...

and some black pepper jumps into the mix.
 
Time for the mashing to commence! A food processor could be used, but since mine is admittedly in storage right now, a simple table fork works just fine. (added bonus is that it is so much easier to clean than the food processor when cream cheese is part of the party)

Okay, now it's time to remove the crust from our plain old white bread. You know, the kind that sticks to the roof of your mouth when you take a bite. Thank goodness that does not happen here! Make one large crustless square out of each slice of bread.


Then I spread our garlic-herb cheese onto it in a decent layer...not too thick or all of it will just ooze out of the wrap during the cooking process.

Now cut each slice in half again. I finish off the other slices the same way and then it's time to turn my attention elsewhere. Time to address our bacon! Out of simple habit I have maple bacon...but really any type of bacon will do just fine.

Take each strip of bacon and cut it in half.

Then I roll the bread, or fold it in half, and wrap it with the bacon.

One little toothpick is all that is needed to secure everything in place.

Then onto the cookie sheet. Putting foil down will insure an easy release for turning the pieces as they cook.

Into the oven everyone goes, on the 2nd rack line on a low broil, for 2-3 10-minute intervals. Check after the first 10 minutes and turn each piece onto it's side. Allow it to bake another 7-8, check to see that nothing is burning...if they need another 2-3 minutes to brown up on that side, then let it happen. One more turn on the the opposite side to make sure that everything is nice and crispy. (I hate bacon that has any slight signs of not being done)

Then out of the oven, onto a plate for about 2 minutes...and into a very happy & salivating mouth.

Delightful Thanksgiving Sides

If you are like me and like to change things up a little bit, or just bring something new to a celebration, then this posting is for you.  I have been gathering some of my favorite recipes that could easily become some of your favorites this holiday season.

Happy Thanksgiving!

 
Bacon Wraps ~ Garlic Herb ~ The Chatty Mom ~ Addictive bites
 

Homemade Cranberry Sauce ~ The Chatty Mom ~ So easy...You'll never go back!


Sweet Potato Banana Crumble Casserole ~ The Chatty Mom ~ So good that I top it with frozen yogurt and serve as dessert!

Photo Source: Erin Coates ~ TheHealtyApron.com
Honey Roasted Sweet Potatoes ~ The Healthy Apron


Scalloped Sweet Potatoes ~ SheWearsManyHats.com

Photo Source: PaulaDean.com
Corn Casserole ~ Paula Dean's recipe

Photo Source: Ree Drummond ~ ThePioneerWoman.com
Whiskey Glazed Carrots ~ The Pioneer Woman's recipe.  Ahhh-MAzing!

Photo Source: Jenny Flake ~ Picky-Palate.com
Cheesy Bacon Green Bean Casserole Pot Pie ~ Picky Palate's recipe

Photo Source: AvocadoPesto.com

Green Beans with Shallots and Pine Nuts ~ Avocado Pesto's recipe - Great alternative to the traditional green bean casserole

Photo Source: The Brown Eyed Baker
Garlic Knots ~ The Brown Eyed Baker

Photo Source: VanillaSugarBlog
Salty Caramel Apple Pie ~ Vanilla Sugar Blog

VeggieTales 40% Off Storewide Sale & FREE Shipping!

Right now The Official VeggieTales Online Store is holding a storewide sale of 40% Off!  Plus FREE shipping on all orders of $30 or more!
Click To Start SAVING!


This happens to be one of my family's favorite set of characters. The VeggieTales cast is adorable and teach valuable biblical lessons to children.  In fact, it is typically my husband and I that select these videos for our family movie nights. The humor hits the kid's funny bone and triggers laughs from adults as well. So clever, so full of truth and values.  Let VeggieTales join your gifts under the tree this year!


Happy Day Parents!

It's another day...
And it's Thanksgiving Week...
Have a laugh and hold your Parent Head up HIGH!


Sweet Potato Banana Crumble Casserole

 
Let's face it...unless you live in the South, the only time that most of us think about making anything with sweet potatoes, or yams, is during the holidays. Well not anymore! I must admit that I have given sweet potatoes a fair shot every year...to no avail. Sweet potatoes/yams + me = unhappy tastebuds. Until now! This dish is so good that it could be served for breakfast, a side for dinner or a dessert. I LOVE this casserole! Finally, sweet potatoes and I have a relationship. A wonderful love affair...even my little Grace loves this (minus the crumble, go figure). 

There is very little that happens in the beginning...Preheat the oven at 375°F. Then I take 3 medium yams, rinse them off and pat them dry. Place the yams on a cookie sheet.

Next a bit of stabbing is required. I grab my modest little table fork and stab the front & back of each yam several times. Note to self: Do Not forget to stab yams...they have a very serious temper. For if you fail to do so, they will EXPLODE! Apparently they do not like being warmed at all.
Into the oven they go...for 20 minutes.

Next we have our bananas...3 large ones to be exact.

I remembered 5 minutes into the roasting that there was a sticker on my bananas.
Reminder: Remove sticker from banana before roasting.
After the yams have cooked for 20 minutes, I add my bananas for 15 minutes of roasting. 

  
After 15 minutes, pull out the bananas. This is when Grace & Rose scrunch up their faces and say "Ewww...Yucky bananas Mama!" And when I spend the next 10 minutes trying to convince them that this is when the bananas are sweet like candy.

The yams still have another 25-30 minutes of roasting, so I allow the bananas to cool a bit. Once they are cool enough to handle, I go ahead and put them in my mixing bowl and whip them for about 10-15 seconds. Just enough to break them down a little before the yams come out and join the party.

Once the yams have finished roasting (after I can insert a fork smoothly into the center of the yam without any resistance), I let them cool for about 10 minutes. Just enough that I can peel away the skin without my fingers feeling on fire.

Toss the yams into the mixing bowl with the bananas and let the whipping commence for about 30 seconds.

Stand back...if the hot mixture doesn't get you, the steam just might. You could do it a bit longer, but I like having a little texture to the dish...not just a smooth paste.

Grab my 2 quart baking dish and start pouring in the banana yam mixture. It smells so good that I have to take a little taste right then...Mmmmm.
 
Smooth it out...although I don't really need to at this time, I still do just because it looks better.

The zester comes out and I zest 1/2 of a navel orange. This step could be skipped if you aren't a fan of orange zest. I've made it with and without and it's phenomenal either way, but I'm just partial to a little bit of the zest. Stir it in...why I don't whisk it in the mixer...I don't know. I just don't. But you Can. :) Then I smooth it all out again. Now for the topping...my crumble. Really easy to do...can I even stress, really easy.

Take a 1/2 cup of all purpose flour and pour it into a medium mixing bowl.

Add a 3/4 cup of light brown sugar.

I take my cold butter, cube it and add it to the flour & sugar. Next a bit of spice...1/2 teaspoon of ground cinnamon...

1/4 teaspoon of ground nutmeg (freshly grated is even better)...

Now my hands get to get into the mix. I crumble the mixture of sugar, flour and spice with the butter until it's well incorporated and chunky. (For extra crunch you could add 1/4 cup chopped pecans!)

Then I just pour the crumble mixture evenly over the yam & banana mash.

Caramelized Topping (1 Tablespoon more butter)
Crunchy Crumble Topping

Into the oven it goes for another 20-25 minutes. Now, if you have a little bit too much butter in the topping (about a tablespoon more) it will look exactly like this batch...more caramelized than crunchy on top.

Caramelized Topping
Crunchy Crumble Topping
Once everything is finished, and the crumble topping is toasted and crunchy on top, I take this heavenly casserole out of the oven and let it set for 10-15 minutes.

Time to dig in!!! My mouth is in heaven...this is finally a side dish of sweet potatoes/yams that I can enjoy eating.
 
If you are in need of a dessert fix, then I highly recommend that you try a dab of Dryers Yogurt Blends Tart Honey frozen yogurt...OH MY GOODNESS!!! You've got to try this. Happy Eating!